





Session: DO.003 
 Age: 15-Adlt |
 Intensity: Medium |
 Time: 25 mins |
 Positions: 2,3, Primary |
 Players: 14 |
 Area: 1/2 Field |
Exercise Objectives
- Coach a team in how to defend in wide areas.
- Coach an outside defender on how to deal with wide attacks.
- Eliminate crosses and shots on goal with good individual defending technique in wide areas. Also improve the functioning of the defending unit in this functional coaching exercise for defending in wide areas. It is vital the outside defenders understand their roles and defending duties in any formation.
Organisation
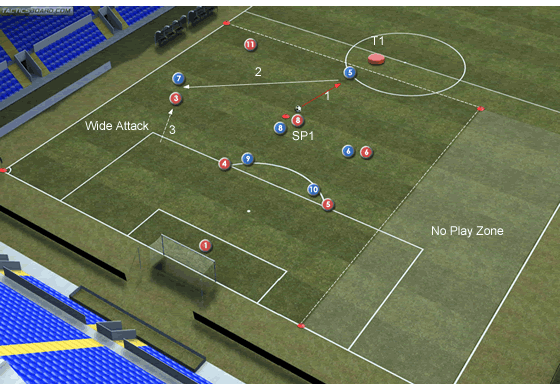
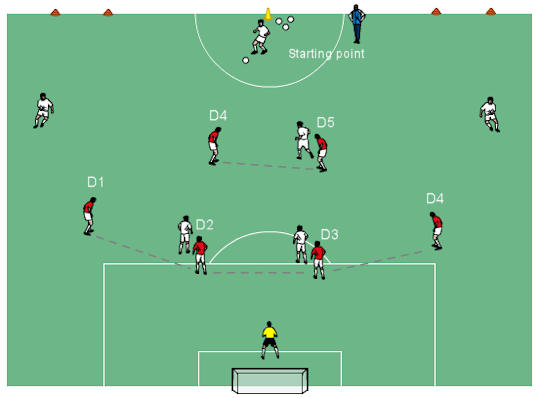
Diagram 1. Set-Up Arrangement
Set-Up
- Mark out 1/2 of a full size pitch (Approx 50x40yrds) with a 'No Play zone' on one side. No Players can enter this zone. The side can be switched depending on which side of the field you want to practice defending on.
- The Red (Defending Team) play 3-3 formation.
- The Blue (Attacking Team) play 1-3-2 formation.
- We are coaching the Red Team and in particular Red Player 3 (Left Back).
- T1 acts as a Target Player and can move up and down behind the dashed line and the half way line. T1 is a target for the defending players to attempt to play to when they regain possession. They are also a supporting player that the Blue (Attacking Team) can use to help maintain possession.
Instructions
- Start Position 1 (Indicated by the orange cone) = R8 (Red Centre Mid) plays a mishit pass through to T1 and it is intercepted by B5.
- The Red (Defending team) attempt to win possession and pass into the Target Player.
- The Blue (Attacking Team) attempt to score on the full size goal.
- When the ball exits the playing area or a goal is scored play restarts from the Starting Position (SP1).
- After a number of attempts the function should progress onto the scenarios displayed in Diagrams 2,3,4.
- Defending and attacking teams should be rotated dependent on the coaches focus and priorities.
Start Position(s)
- R8 (Red Centre Mid) plays a mishit pass through to T1 and it is intercepted by B5.
- B5 (Blue Centre Back) passes into B7 (Right Midfielder).
- R3 steps forward to press B7.
Scoring
- Red Team = 1pt for passing into the Target Player (T1)
- Blue Team = 1pt for scoring in the full size goal.
Coaching Points
- Discuss both individual and group defending in wide positions.
- For the full back pressing, in general show the attacking player outside to the touch line to isolate. May be situations where you could show inside to weaker foot or if you need support to deal with pace of attacker.
- Control speed of approach so no to dive in.
- Discuss angle of approach.
- Keep the feet moving whilst jockeying.
- Going to ground (i.e. slide tackle) should be a last resort.
- Prevent Crosses and Shoots.
- Feint to tackle.
- Focus. Eyes on the ball at all times.
- Discuss secondary positioning of the centre backs and supporting mids. Refer to the diagrams below for additional explanations.
- Discuss delay, cover and support with the centre backs supporting.
- Compact the play as a team and slide to the strong side of the field.
- Consideration that when the ball is played the roles of the defenders will change and they need to adjust quickly.
- Defending Midfielders should be tracking any attacking runs from midfield.
- On aerial long balls (as in Diagram 2) players should read the play and assess the ball carriers body position. If shaping to play long the back 3 defenders should be side on and ready to drop as a unit to protect the space behind them.
- Defenders should not over commit to challenges they cannot win.
- Defenders need to consider their body positioning in pressing (i.e. press with bias to one side, how tight they want to mark, weight over the front foot).
- When acting as a supporting defender, consider lines of cover and balance in relation to the player pressing the ball and other team mates.
- The outside backs can feint to tackle forcing the ball carrier to look down.
Progressions
Progression 1
- R8 passes into B5.
- Ball Played into space behind the full back (Centre backs assist and track runners)
- B5 takes a touch and delivers a long aerial pass over the Red defenders. R3, R4, R5 should be side on and ready to drop in to cover the space.

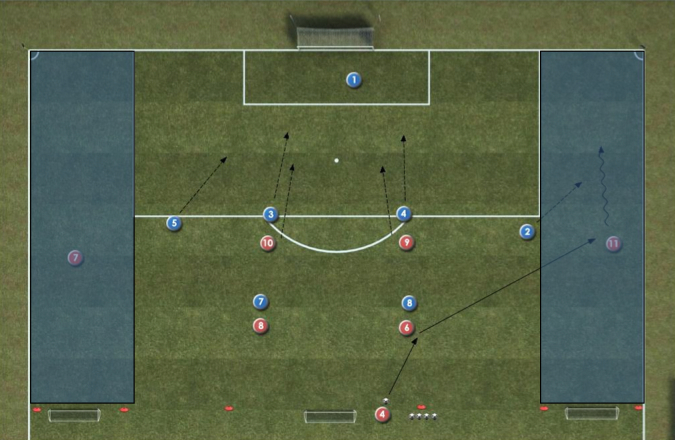
Diagram 2. Ball Played into space behind the full back (Centre backs assist and track runners)
Progression 2
- R8 passes into B5.
- a) Ball Played into forwards feet (B9) or b) played in the air (for a header/chest).
- R4 presses the forward in possession to force play backwards. R3 and R5 drop in to cover R4.

Diagram 3. Ball Played into forwards feet or aerially.
Progression 3
- R8 passes into B5.
- Ball Played into midfielder (B8). Closest defending player (R8) presses.
- R3,R4,R5 attempt to step the line up if there is considerable pressure on the ball.

Diagram 3. Ball Played into midfielders feet.
Variations
- Alter the starting position and have the wing player start with the ball at their feet.
- Alter the starting position and have a misplaced pass into one of the back 3 of the attacking team to begin play.
- Alter the starting position and have the GK kick (punt) the ball out to B5.
 Darren Pitfield
 Alexander Trukan

 TonyDeers