Organisation
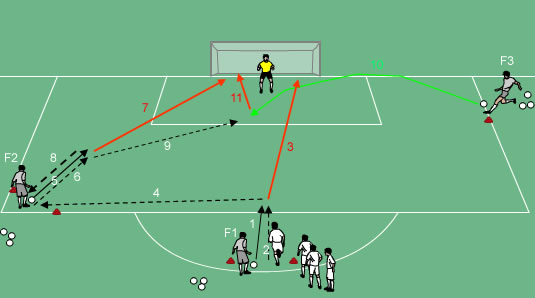
Diagram 1. Set-Up Arrangement
Set-Up
- Using a 1/2 field and a full size goal place cones in the positions shown above.
- The feeders indicated in orange should have a collection of balls each.
Instructions
- F1 passes a ball out in front of A1.
- A1 runs in chasing the ball.
- A1 shoots.
- A1 turns and sprints towards the top gate.
- F2 passes a ball out in front of A1.
- A1 tags the line with their hand and sprints out after the ball played out from F2.
- A1 shoots on goal.
- A1 turns and sprints back to the line they just tagged and tag that line again.
- A1 then sprints in to the area for a cross.
- F3 passes (crosses) the ball in.
- A1 finishes.
- The drill is then repeated.
Scoring
- Drill can be organized into 2 teams. Teams can either compete one after the other with a 4 minute time limit to see how many goals they can score. The goalkeeper is from the other team or your standard team goalkeeper.
Coaching Points
- Good driven shooting technique (Knee & Shoulder over ball, non-kicking foot, etc.)
- Correct technique for each attempt on goal.
- Hit the target (force a save from the goal keeper).
- Technique under fatigue.
Progressions
- Different types of passes; low, driven, aerial delivered from the feeders.
- 2 touch finishing.
- 1 touch finishing.
- Add a passive defender in the penalty area to defend they must beat.
- Add an active defender in the penalty area to defend they must beat.
Variations
- This drill can also be done simultaneously with 2 goals. This allows more players to be working at one time.






 Age: 12-Adlt
 Intensity: Medium
 Time: 20 mins
 Positions: 9,10,11,7
 Players: 8+
 Area: 35x35 yrds